Development Workflow#
You already have your own forked copy of the iris repository, by following Making Your own Copy (fork) of Iris. You have Set up Your Fork. You have configured git by following Configure Git. Now you are ready for some real work.
Workflow Summary#
In what follows we’ll refer to the upstream iris main branch, as
“trunk”.
Don’t use your
main(that is on your fork) branch for development.When you are starting a new set of changes, fetch any changes from trunk, and start a new feature branch from that.
Make a new branch for each separable set of changes — “one task, one branch”.
Name your branch for the purpose of the changes - e.g.
bugfix-for-issue-14orrefactor-database-code.If you can possibly avoid it, avoid merging trunk or any other branches into your feature branch while you are working.
If you do find yourself merging from trunk, consider Rebasing on Trunk
Ask on the Iris GitHub Discussions if you get stuck.
Ask for code review!
This way of working helps to keep work well organized, with readable history. This in turn makes it easier for project maintainers (that might be you) to see what you’ve done, and why you did it.
See linux git workflow for some explanation.
Update the Mirror of Trunk#
First make sure you have done Linking Your Repository to the Upstream Repo.
From time to time you should fetch the upstream (trunk) changes from github:
git fetch upstream
This will pull down any commits you don’t have, and set the remote branches to
point to the right commit. For example, ‘trunk’ is the branch referred to by
(remote/branchname) upstream/main - and if there have been commits since
you last checked, upstream/main will change after you do the fetch.
Make a New Feature Branch#
When you are ready to make some changes to the code, you should start a new branch. Branches that are for a collection of related edits are often called ‘feature branches’.
Making an new branch for each set of related changes will make it easier for someone reviewing your branch to see what you are doing.
Choose an informative name for the branch to remind yourself and the rest of us
what the changes in the branch are for. For example add-ability-to-fly, or
buxfix-for-issue-42.
# Update the mirror of trunk
git fetch upstream
# Make new feature branch starting at current trunk
git branch my-new-feature upstream/main
git checkout my-new-feature
Generally, you will want to keep your feature branches on your public github
fork of iris. To do this, you git push this new branch up to your
github repo. Generally (if you followed the instructions in these pages, and by
default), git will have a link to your github repo, called origin. You push
up to your own repo on github with:
git push origin my-new-feature
In git >= 1.7 you can ensure that the link is correctly set by using the
--set-upstream option:
git push --set-upstream origin my-new-feature
From now on git will know that my-new-feature is related to the
my-new-feature branch in the github repo.
The Editing Workflow#
Overview#
# hack hack
git add my_new_file
git commit -am 'NF - some message'
git push
In More Detail#
Make some changes
See which files have changed with
git status. You’ll see a listing like this one:# On branch ny-new-feature # Changed but not updated: # (use "git add <file>..." to update what will be committed) # (use "git checkout -- <file>..." to discard changes in working directory) # # modified: README # # Untracked files: # (use "git add <file>..." to include in what will be committed) # # INSTALL no changes added to commit (use "git add" and/or "git commit -a")
Check what the actual changes are with
git diff.Add any new files to version control
git add new_file_name.To commit all modified files into the local copy of your repo, do
git commit -am 'A commit message'. Note the-amoptions tocommit. Themflag just signals that you’re going to type a message on the command line. Theaflag will automatically stage all files that have been modified and deleted.To push the changes up to your forked repo on github, do a
git
push
.
Testing Your Changes#
Once you are happy with your changes, work thorough the Pull Request Checklist and make sure your branch passes all the relevant tests.
Ask for Your Changes to be Reviewed or Merged#
When you are ready to ask for someone to review your code and consider a merge:
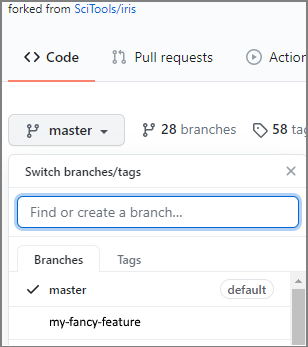
Go to the URL of your forked repo, say
https://github.com/your-user-name/iris.Use the ‘Switch Branches’ dropdown menu near the top left of the page to select the branch with your changes:
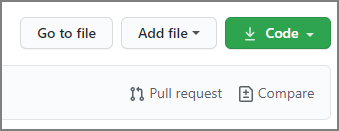
Click on the ‘Pull request’ button:
Enter a title for the set of changes, and some explanation of what you’ve done. Say if there is anything you’d like particular attention for - like a complicated change or some code you are not happy with.
If you don’t think your request is ready to be merged, just say so in your pull request message. This is still a good way of getting some preliminary code review.
Some Other Things you Might Want to do#
Delete a Branch on Github#
git checkout main
# delete branch locally
git branch -D my-unwanted-branch
# delete branch on github
git push origin :my-unwanted-branch
Note the colon : before test-branch. See also:
guides/remove-a-remote-branch
Several People Sharing a Single Repository#
If you want to work on some stuff with other people, where you are all committing into the same repository, or even the same branch, then just share it via github.
First fork iris into your account, as from Making Your own Copy (fork) of Iris.
Then, go to your forked repository github page, say
https://github.com/your-user-name/iris, select Settings,
Manage Access and then Invite collaborator.
Note
For more information on sharing your repository see the GitHub documentation on Inviting collaborators.
Now all those people can do:
git clone git@githhub.com:your-user-name/iris.git
Remember that links starting with git@ use the ssh protocol and are
read-write; links starting with git:// are read-only.
Your collaborators can then commit directly into that repo with the usual:
git commit -am 'ENH - much better code'
git push origin main  # pushes directly into your repo
Explore Your Repository#
To see a graphical representation of the repository branches and commits:
gitk --all
To see a linear list of commits for this branch:
git log
Finally the Fancy Log Output lg alias will give you a reasonable text-based
graph of the repository.
Rebasing on Trunk#
For more information please see the official github documentation on git rebase.